Thursday, June 26, 2008
Debugging C/C++ under Linux
Saturday, May 24, 2008
FFmpeg: An open source video codec
First of all this may be considered a research post but I think that you may find something interesting in this post as a developer.
Have you ever watched a movie…oh yeah…ok have you ever imagined that won’t be able to watch this movie without a video codec?!
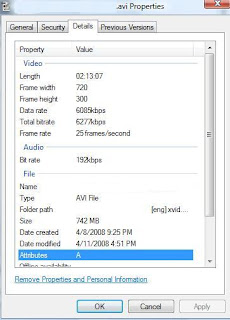
Yeah… imagine that you have a movie with these features indicated in the figure bellow and suppose that this move is stored in your HD without any codec as just raw image frames in RGB format? Do you know how much space it will take from HD? It will take about 120 Giga Bytes

Yes its true; verify [720*300*3*25*(60*(60*2+13) +7)]/2^30 = 120.5 GB
But actually the file is stored at my PC using only 742 MB and so it seems that the codec made a compression ratio 1 : 166, isn’t great?
What does this means? This means that you could never store more than a single movie at your 160 GB HD, It also means that you could never burn a movie on a DVD and shares it with your friends, Ask yourself another question…What if this video was stored in the original desktop digestions e.g.; 800 X 600 pixels..It will overflow your weak HD :P.
But thanks God … this scenario doesn’t happen and the favor returns to video codec
For a second trial imagine that you view this movie on the internet for a 10 minutes, then your internet connection needs to transfer [425*355*3*25*10*60]/2^30 = 6.2 GB in a raw RGB video format
You may need to buffer for many weeks or even months to be able to view it on your strong ADSL link…What a disaster if the internet congested by millions of users like you…Internet might die.
But actually this live movie is about 20-30 MB only
So in simple definitions a video codec is a lossy compression technique used to compress/decompress multimedia to be suitable for storage and transmission
Video codec consist of encoder and decoder and there are many of them some are commercial and others are open source and a lot of them are under progress, for more information you can visit the multimedia home page.
As an example of a codec is the MPEG-4 which is implemented in the open source project ffmpeg, MPEG-4 codec has the facility that it can produce different quality stream output from the same original video for different quantizer scales, In MPEG-4, the valid quantizer scale values are in the range 1 to 31, with 1 producing the highest quality and bit rate
So let’s encode a video file with different quantizer scales (1-31) and compare the visual appearance and output stream size
You can see in the image bellow that the left half of the lady is after using Fair & Lovely lotion and the right is not.
This is not true; the left half is the output of the encoded video file after using a quantizer scale = 1, and the right is using 31…So which quality or appearance you prefer? I know the left… but to be fair who specify that is not your wish, but it depends for example on the available resources … you can’t view a live movie with the good quality one a dialup network connection instead for low speed connection you should use less good quality one
By numbers, let’s see the compression ratio for each quality value (1-32), Original raw file size is 44550 KB
| Quality value from best to worst | 1 | 2 | 3 | … | 15 | 16 | … | 30 | 31 |
| Decoded steam size in KB | 995 | 992 | 627 | … | 135 | 129 | … | 83 | 83 |
| Compression ratio to raw file 1 : | 44 | 44 | 71 | … | 330 | 345 | … | 536 | 536 |
Isn’t amazing to compress a file with a compression ratio of 44 for best quality with tha same appearance like the original file and 536 for worst quality?
You can transfer this 10 seconds file over any network starting from 995 KB ~= 1 MB for high speed network or 135 KB for medium speed network or 83 KB for slow Dial Up connection
Let’s take a running example using ffmpeg :
Download demo 2MB on Windows ; Just run the encode.bat & decode.bat after downloading akiyo_cif300.yuv into your working folder
Download demo 2MB on Linux ; Just run the encode.sh & decode.sh after downloading akiyo_cif300.yuv into your working folder
Download demo output raw video file click here (44 MB) and to play YUV file please refer to my previous post
Also you can download coded video files High 995 KB, Medium 135 KB, Low 83 KB Quality, You may need k-Lite codec to play these files or run the decoder to return them to YUV format
It is very interesting that ffmpeg source code is available for public, it is cross-platform and this another advantage, you can also enhance it and build over what the community did, and your product will be used by Video LAN or a lot of other projectsTuesday, May 20, 2008
Geany: A lightweight IDE for C++ under Linux
Geany is available through the official Debian archives.
sudo apt-get install geany
Tuesday, May 6, 2008
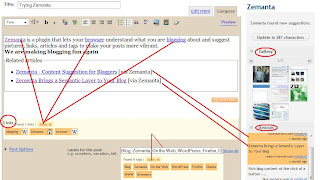
Zemanta...We are making blogging fun again

Thursday, May 1, 2008
Remote Desktop at your Ubuntu from your Windows and versa
In all the past cases there was the same scenario where a Windows machine needs to remote access another Windows machine which is simple and needn't setup stuff
The problem here is that now I spend my time among my own apartment in which I can carry my portable PC there and my family apartment in which my desktop "shared resource" is sitting there . While I have to work with my stuff at my Ubuntu desktop PC?!
There are two available solutions for this conflict:
Solution # 1:Every time I go to my apartment I can carry my desktop (case + monitor + table + chair) ... great.. isn't it? but this may explode other problems
Solution # 2:Is to access my Ubuntu desktop remotely with only one click and LAN connection between us ... very interesting ... isn't it?
So to summarize solution # 2
To configure Remote Desktop at your Ubuntu
You need to go to System -> Preferences -> Remote Desktop and check options there for sharing and security
To connect from Windows machine
You need to install vncviewer and simply run it to access your Ubuntu

Enjoy Remoting @ Linux :)
You may ask how can i do the reverse operation of connecting to your Windows machine from your Linux?
The steps is very easy to connect remotely @ your Windows OS from your Ubuntu:
To configure Remote Desktop at your Windows
1- Install TigntVNC Server then run it and assign the client connection password
To connect from Ubuntu machine
2 -Open Applications -> Internet -> Terminal Server Client and connect using Computer, Protocol, User Name fields
3- Then you will be notified to enter the client password set in step 1
Enjoy Remoting @ Vista :)
For more information you can follow these links:
Wednesday, April 16, 2008
Cygwin: Linux Environment Over Windows
With Cygwin you can install and run all Linux compliant applications over your Windows O/S. To me I was very stratified with my Linux installation on my desktop, but I had to reinstall NS-2 on my Windows for the purpose of portability
I Still dream of the day that I can get rid of Windows for ever and shut up singing songs like this ... But it seems that it isn't very soon and may never come
But until this moment and after installing platform independent applications on Linux and Window I can feel that I'm now a Cross Platform Human being or a Platform Independent Person ... and still there are many cross roads that I must pass quickly
For a quick reference on installing Cygwin just click here
YUV Genius: A YUV Renderer Through Windows Media Player
You can get many YUV files from this mmLab page
There is some open source projects that able to render this format like this C++ Project
You cans aslo use YUV Genius to render this file in Windows Media Player , YUV Genius is a smart YUV renderer, which can enrich your Windows Media Player with the capability of YUV rendering. By this way the viewing of YUV files is as simple as just double click on a YUV file and Windows Media Player will know what to do.
Click here to download the YUVGenius package
For more information you can follow this link
Thursday, April 10, 2008
Overriding UDP and Application layer in NS-2
This article is a great, it explains the process in more detail but it is application specific and more complicated that the needed stuff. So I tried to down the stairs and make a simplified version of the code to override the UDP and Application layer.
To run the example you just need to do the following steps:
1- Download the source and extract it then place the ex1 folder @ /your path/ns-allinone-2.32/ns-2.32/
2- Modify the ns-default.tcl file @ /your path/ns-allinone-2.32/ns-2.32/ tcl/lib/
Add the following line
Agent/UdpLayer set packetSize_ 1052
3- Modify the Makefile.in @ /your path/ns-allinone-2.32/ns-2.32/
Put in the OBJ_CC list the following lines
ex1/udplayer.o \
ex1/sinklayer.o \
ex1/trafficlayer.o \
@V_STLOBJ@
4- Recompilation of NS-2
cd /your path/ns-allinone-2.32/ns-2.32/
./configure;
make clean; make
5- Run the example
ns ex1/test.tcl
I hope this can help and I can do next tasks quickly
Saturday, March 15, 2008
Folder and File sharing between Linux and Windows
Yea.. it is funny, but this due to my laziness to Google it
But now every thing is okay and I can freely share files between my 2 PCs
So to summarize:
To share files between Linux(Ubuntu) and Windows(Vista) you can use Samba
Samba is a free software re-implementation of SMB/CIFS networking protocol. Samba is released under the GNU General Public License. Samba provides file and print services for various Microsoft Windows clients and can integrate with a Windows Server domain, either as a Primary Domain Controller (PDC) or as a Domain Member. It can also be part of an Active Directory domain. Samba runs on most Unix and Unix-like systems, such as Linux, Solaris, and the BSD variants, including Apple's Mac OS X Server (which was added to the Mac OS X client in version 10.2). Samba is standard on nearly all distributions of Linux and is commonly included as a basic system service on other Unix-based operating systems as well.
For how to step by step of using Samba kindly check this Wiki page


